Hub Certificate
Hub communication to AWS
Once the hub has retrieved its credentials from the hub.api.surehub.io endpoint it connects to AWS IoT using a client certificate to AWS IoT MQTT
Surepet using AWS generates a per-device client certificate and sends it in the credentials response to the hub as a PKCS12 encrypted certificate.
Each hub has a unique long_serial which is a 16 byte upper case string stored in the persistent flash directly after the hub's serial number so it isn't overwritten each time the hub receives a firmware update which is used to decrypt/open the PKCS12 Certificate.
A firmware update from SurePet to version 2.201 from the version I first built the stack on 2.43 has meant that the hub now checks the Certificate it is connecting to is legitmate. Which is annoying. However this has lead to me discovering that the firmware is first XORed with the Long Serial Key, then a static XOR Key.
Why is that important? So it means and all you need to do is download the firmware, find the XOR Key, then apply the Static XOR Key and you now have the Long Serial Key and then reorder it to have the Long Password. So no more needing to solder the console cable on, just download the firmware and you can crack open the AWS Client Certificate.
Download Firmware Crack XOR Key process
To download the firmware you need to download all the firmware pages, the number of pages you need to download is in the first file:
serial_number=H0xx-0xxxxxx
page=00
bl=1.177
curl -X POST -s -d "serial_number=$serial_number&page=$page&bootloader_version=$bl" -H "Content-Type: application/x-www-form-urlencoded" -H "User-Agent: curl/7.22.0 (x86_64-pc-linux-gnu) libcurl/7.22.0 OpenSSL/1.0.1 zlib/1.2.3.4 libidn/1.23 librtmp/2.3" -o $serial_number-$bl-`printf "%02g" $page`.bin http://hub.api.surehub.io/api/firmware
Each firmware image has a 36 byte header, the 3rd field is the number of pages / files to download in Hex, around 71 or so.
The download_firmware function in https://github.com/PetHubLocal/pethublocal/blob/main/pethublocal/functions.py is what downloads the firmware.
Then the XOR key is 16 bytes, and the most typical value in the decrypted firmware is 16 bytes of all zeros. So if you load the firmware, split it into 16 byte chunks and sort by how many unique values are in the firmware, the most frequent value is the XOR key, as that is XORed with zero. Thank you Toby for figuring this out :) Finding the XOR Key is in the find_firmware_xor_key function.
So now with the XOR Key, there is a static XOR Key of a71e569f3ed42a73cc4170bbf3d34e69 which if you XOR against the XOR Key you just found gives you the long_serial_key which is the same value printed on the console during firmware updating. So we no longer need to solder on the console even though it is quite handy for debugging.
Then using the same byte order swap process you have the long_serial aka the Certificate Password.
Firmware Update Console Long
This string is not sent to the serial console via the normal process but it is only sent to the console during the firmware update process when you hold down the reset button underneath the hub or send the X-Update=1 header in the Credentials response so that is what this process documents connecting up to the serial console and performing the firmware update so that the long_password can be captured and used to decrypt the PKCS12 certificate.
If you want to capture all traffic between the hub and AWS IoT MQTT server using PolarProxy then you need to configure PolarProxy to use the client certificate with the long_password to open the file.
Understanding the hub boot process and the Client Certificate sent in the credentials response from the surehub api
When the hub boots it does a x-www-form-urlencoded POST of the hubs serial number and mac address to hub.api.surehub.io to retrieve the hubs credentials.
fw=2.43
curl -v -k -d "serial_number=H0xx-0xxxxxx&mac_address=0000xxxxxxxxxxxx&product_id=1&firmware_version=$fw" -H "curl/7.22.0 (x86_64-pc-linux-gnu) libcurl/7.22.0 OpenSSL/1.0.1 zlib/1.2.3.4 libidn/1.23 librtmp/2.3" -H "Content-Type: application/x-www-form-urlencoded" -X POST -o credentials.bin https://hub.api.surehub.io/api/credentials
The credentials response contains a colon : delimited file which is used to configure the hub each time it boots, it also means that to run completely offline you need a backup of the credentials file.
v02:ssssss:uuuuuuuu-uuuu-uuuu-uuuu-uuuuuuuuuuuu:::1:v2/production/uuuuuuuu-uuuu-uuuu-uuuu-uuuuuuuuuuuu:a5kzy4c0c0226-ats.iot.us-east-1.amazonaws.com:MII...==
The decoded credentials are also printed to the console output when the hub boots.
-------- Credentials Decoded --------
	Host:		a5kzy4c0c0226-ats.iot.us-east-1.amazonaws.com
	Client ID:	uuuuuuuu-uuuu-uuuu-uuuu-uuuuuuuuuuuu
	Base Topic:	v2/production/uuuuuuuu-uuuu-uuuu-uuuu-uuuuuuuuuuuu
	Version:	v02
	ID:		ssssssuuuuuuuu-uuuu-uuuu-uuuu-uuuuuuuuuuuu
	Username:
	Password:
	Network Type:	1
	Certificate:	MII...==
 	Length:		2611
	Cert Hash:	0x..
	Key Hash:	0x..
-------- End Credentials --------
The fields
| Field | Example Value | Description |
|---|---|---|
| 0 | v02 | Version, which is always 'v02' |
| 1 | ssssss | ID which is serial number after the - with no leading zeros |
| 2 | uuuuuuuu-uuuu-uuuu-uuuu-uuuuuuuuuuuu | Client ID which is just an AWS issued UUID for the MQTT Client ID |
| 3 | MQTT Username, which is blank but can be set if your local MQTT broker requires authentication | |
| 4 | MQTT Password, which is also blank but can be set as required | |
| 5 | 1 | Network Type, always set to 1 |
| 6 | v2/production/uuuuuuuu-uuuu-uuuu-uuuu-uuuuuuuuuuuu | Base Topic, this is updated to pethub/hub/serialnumber for pethublocal |
| 7 | xx | Certificate a base64 encoded PKCS12 AWS issued Client Certificate with a password that is hard-coded into the hub flash |
So we care about the last field which is the Client Certificate that we want to crack open.
Connecting a TTL Serial Adapter to the Hub Serial Console
If you have a H010 revision hub or have already upgraded the firmware then you need to get a soldering iron out to get the password. This will of course void any warranty and don't blame me if you brick your hub, that being said, it isn't that hard. You will need a TTL 3.3v Serial Adapter, the CP2102 microusb ones are as cheap as chips on AliExpress and the advantage of the microusb is reducing the weight on the connector so search for "CP2102 Micro USB Aliexpress" and plenty of results will come up
Hub pins
The pads on both sides of the board connect to the other side, so the below photos show the pin connections on both sides of the boards. This may not be 100% correct so please check this before connecting anything.
| Hub | Hub Pins | |||||||||||||||||||||||||||||||||||||||||||||
|---|---|---|---|---|---|---|---|---|---|---|---|---|---|---|---|---|---|---|---|---|---|---|---|---|---|---|---|---|---|---|---|---|---|---|---|---|---|---|---|---|---|---|---|---|---|---|
|
Hub ethernet side with pins labelled
|
|
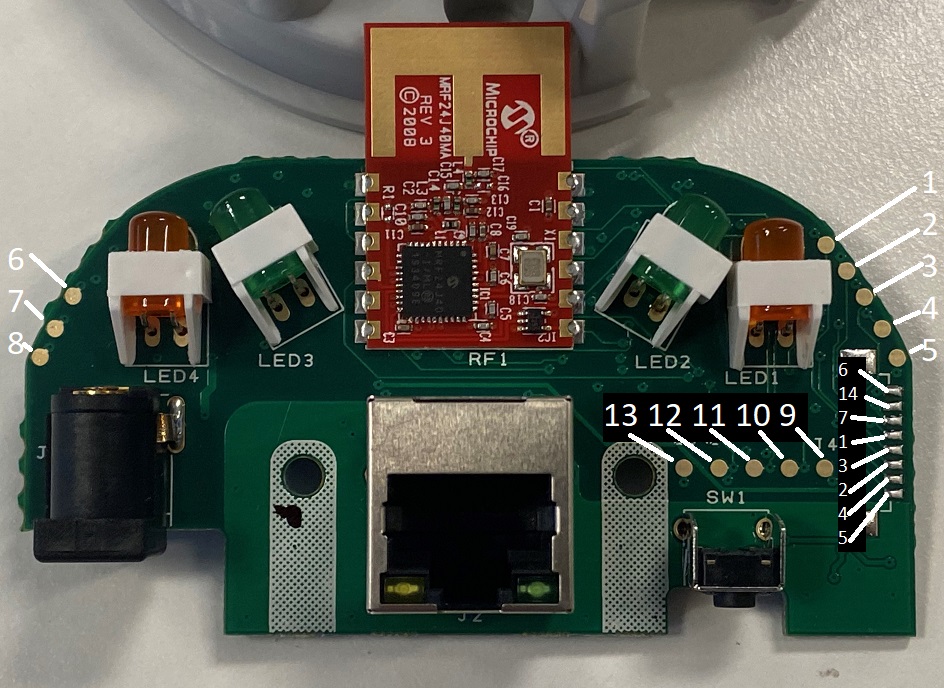
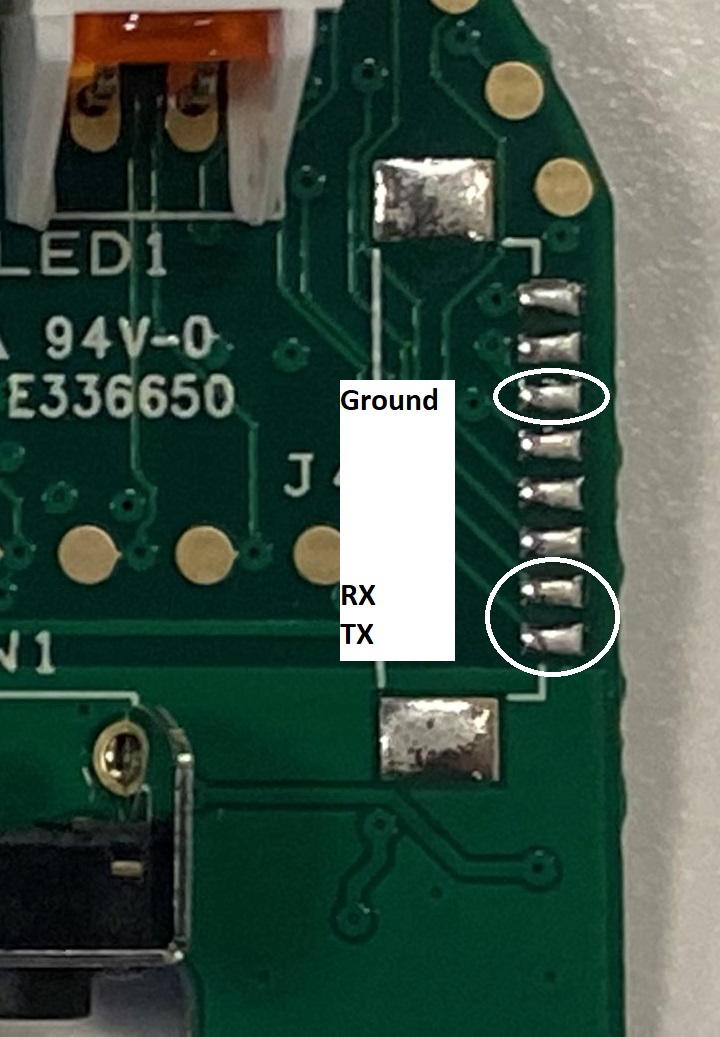
Side Connector
| Side Connector | Soldering information |
|---|---|
|
Serial console pins |
Soldering the console I personally recommend as per devices to connect to the Ground Pin 7, 4 & 5 on the side connector as I find them easier for long term connection otherwise the top pins on either side work too. Bottom two for RX/TX on the side with 5 pads and middle with the side with 3 pads. |
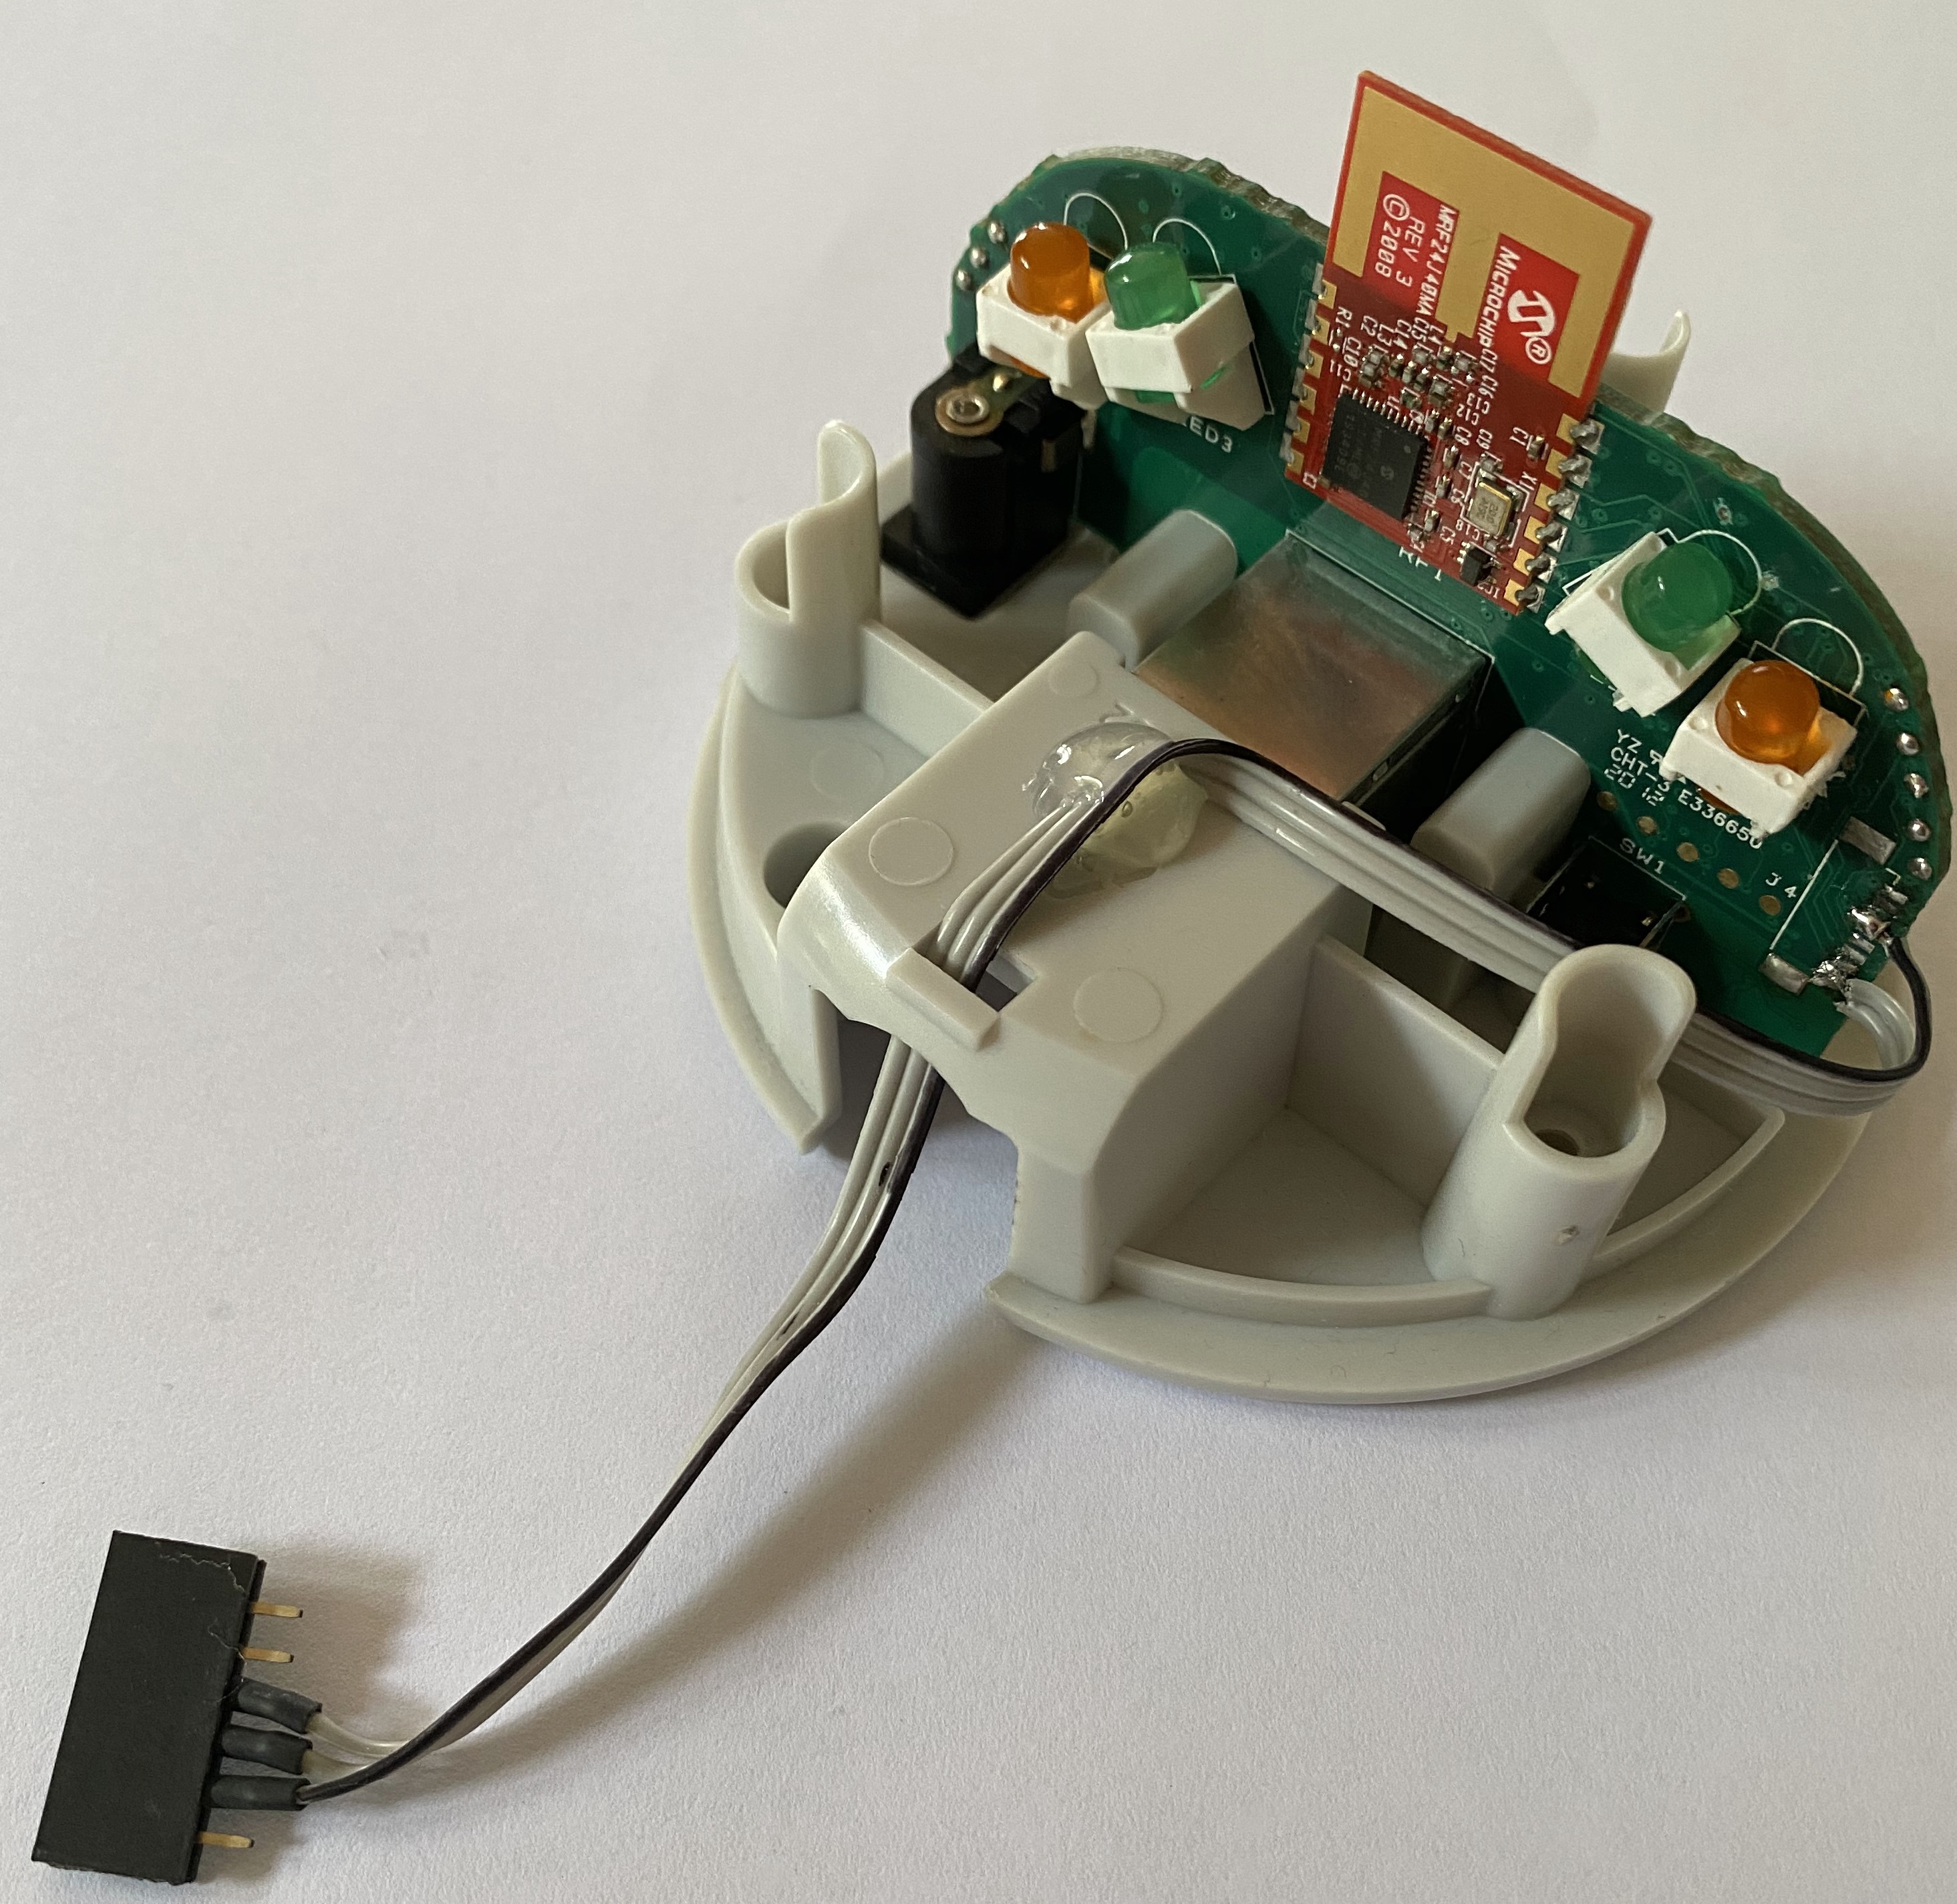
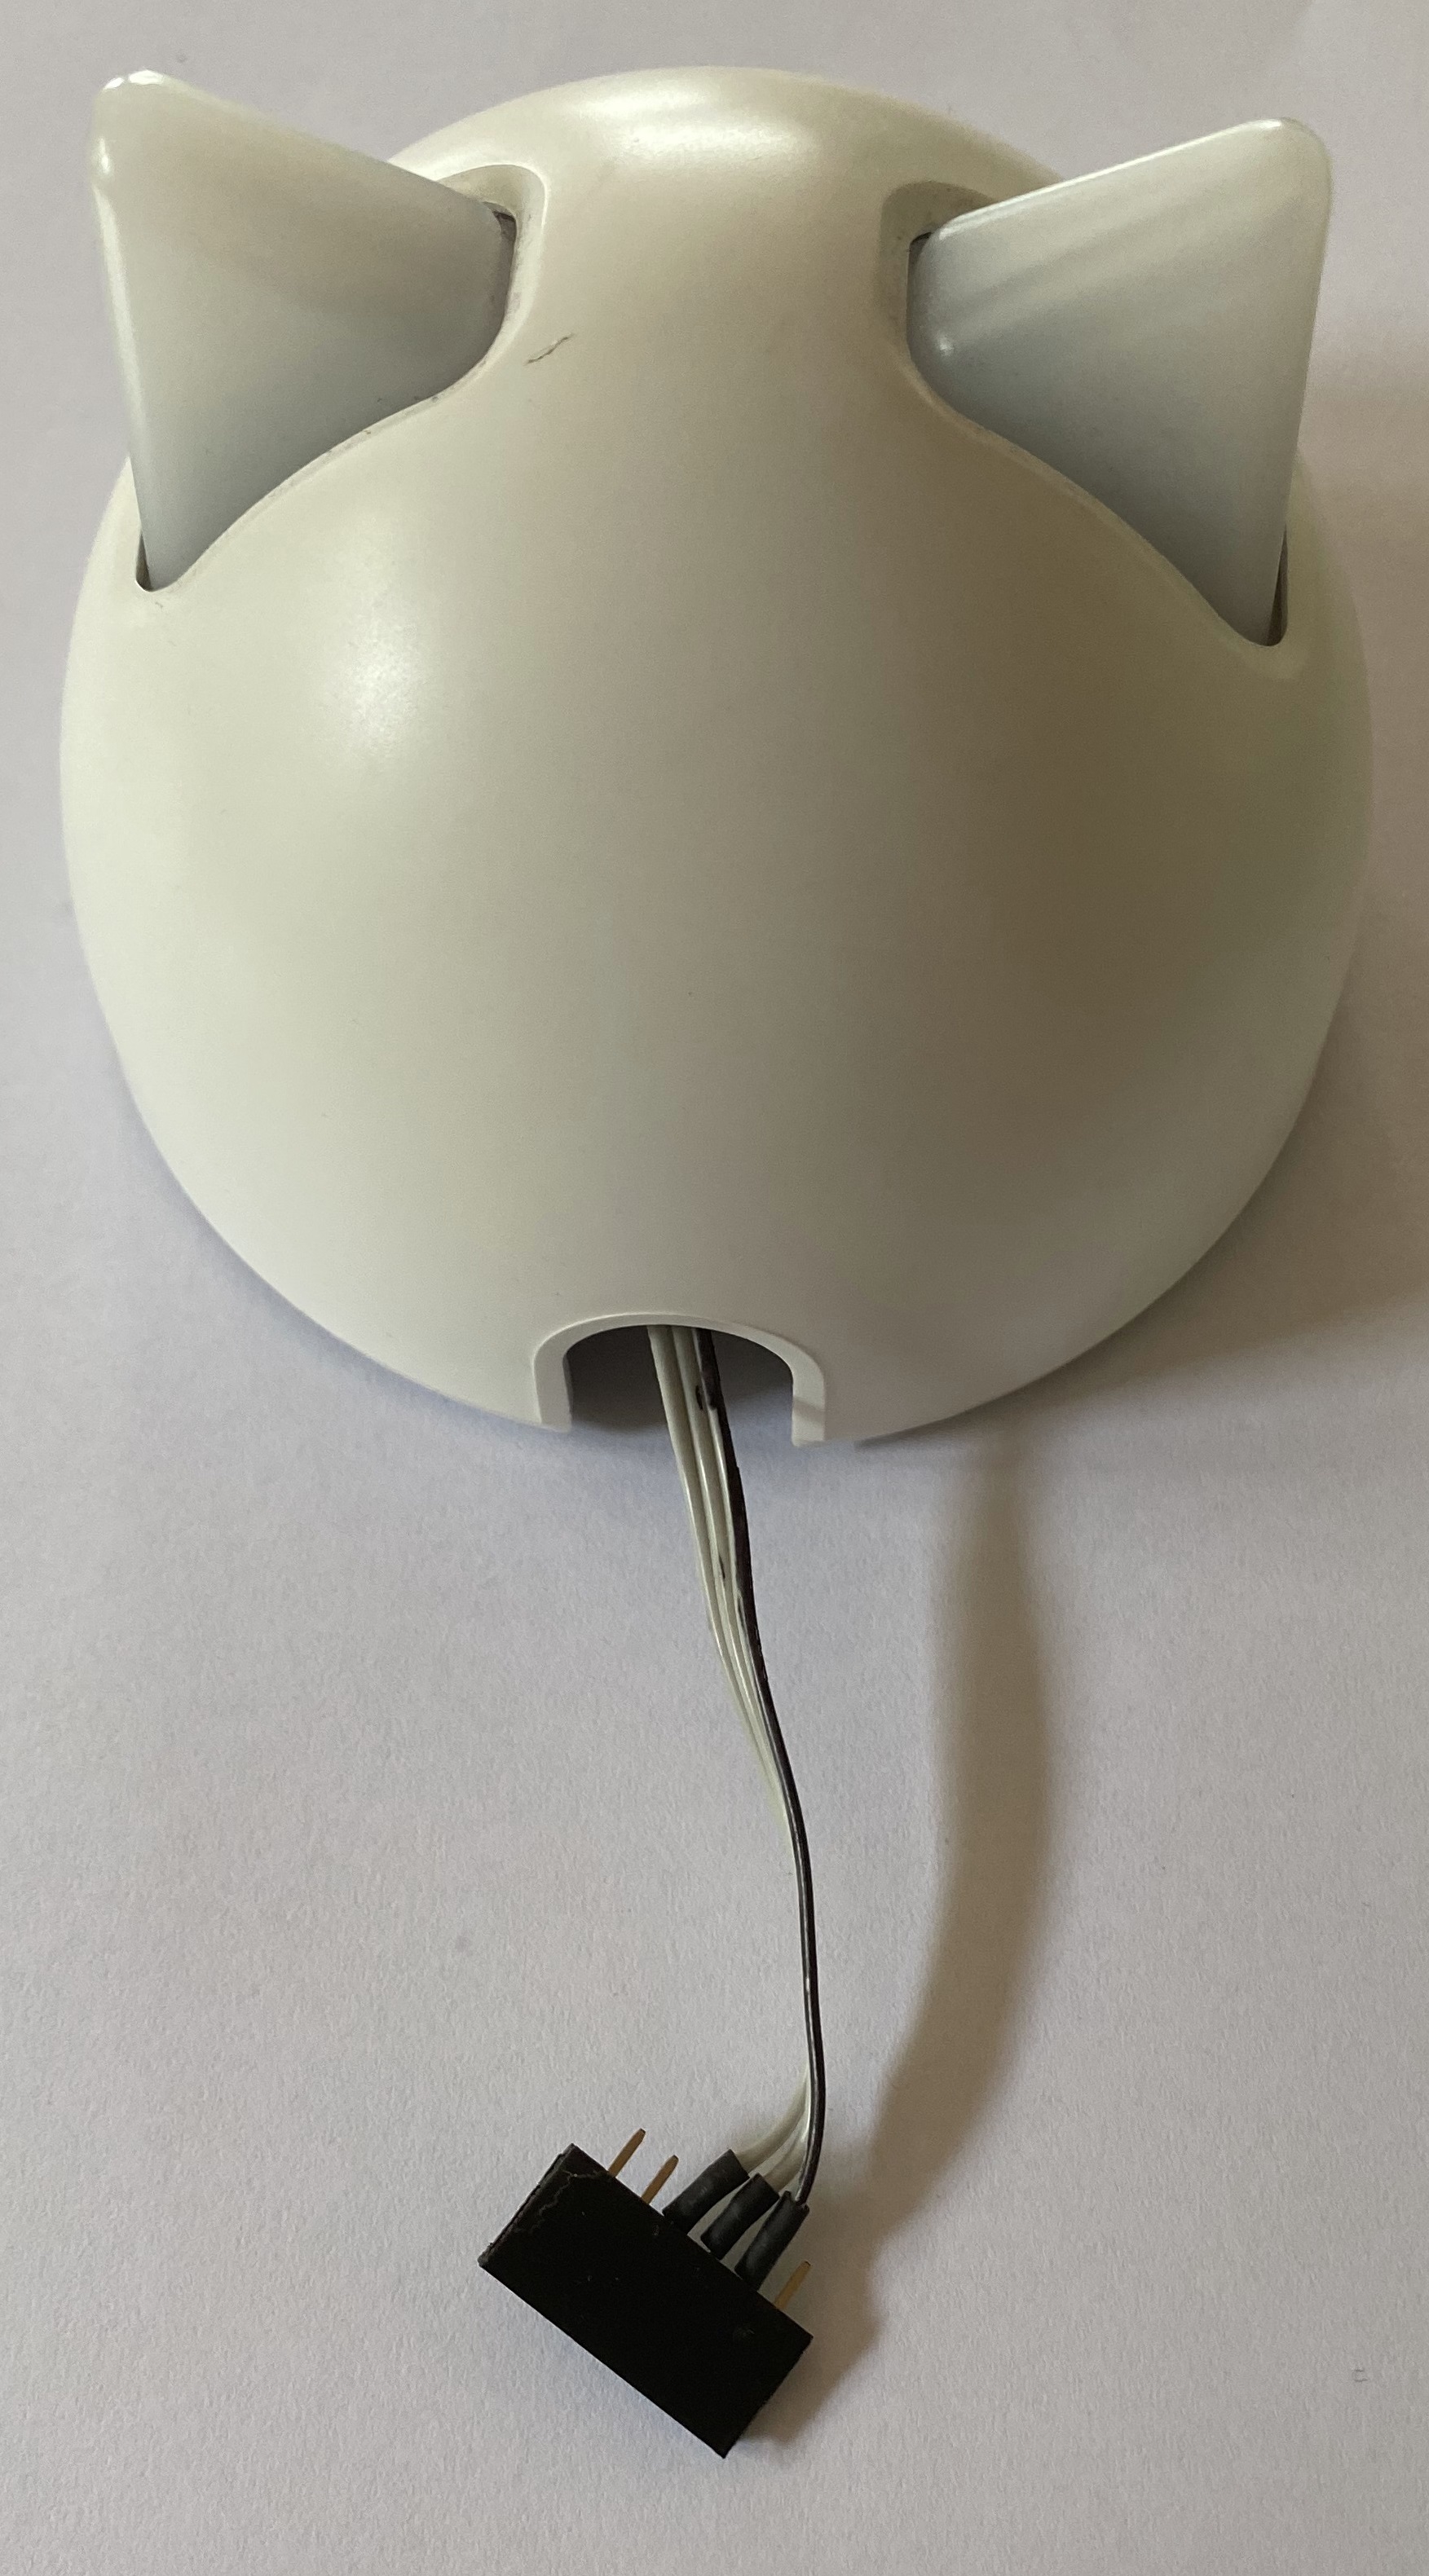
Final Setup
Serial console attached with ribbon cable long enough to allow the case to be put back on
Serial Connection on your computer
Then connect the serial console speed is: 57600 8/N/1
On Linux I prefer minicom as it just works to capture all traffic from the command line and set the baud rate.
minicom -D /dev/ttyUSB0 -b 57600 -C pethublocal.txt
Or if you want to use stty make sure to set your TTY to raw mode, otherwise the terminal driver might interfere by interpreting control characters.
stty -F /dev/ttyUSB0 raw 57600
Or Windows use Putty, and make sure you log to a file, or change the line of scrollback to 20000
Downloading firmware locally
With pethublocal installed you can download the firmware.
pethublocal firmware -sn H0xx-xxxxxxx
This downloads the firmware based on the Hub Serial Number as each firmware is XORed using the password, or if you are using the older release of pethublocal then the first time the hub boots it downloads the firmware.
Using pethublocal setup also downloads the firmware if you select Y when prompted to download Credentials and Firmware and creates the files named H0xx-0xxxxxx-1.177-xx.bin where the last two xx are the 77 pages of the firmware, starting at 0 and going to 76. They are XOR encrypted and decrypted by the hub during the firmware update.
BE AWARE YOU ARE JUST ABOUT TO FIRMWARE UPDATE YOUR HUB. DO NOT UNPLUG IT WHILE IT IS DOING THE UPDATE AS YOU COULD BRICK YOUR HUB JUST LEAVE IT TO COMPLETE!!!!
Then if you have it working on 57600/8/N/1 you should see the standard boot message when the hub normally. You should save the console log output to a file, as the firmware update generates about 20k lines, so if you are using Windows and Putty change the scroll back to 200000 or some large number.
The output from the firmware update is around 20,000 lines so when doing the firmware update process make sure you save everything to a file or have a large scrollback as you might miss it as it comes in the beginning. Also the firmware is XOR encoded with the key and split into around 76 4kb files. So pethublocal also downloads all the firmware locally to save for later if needed.
The interesting part of the firmware update is after the first record is sent and it extracts the password from flash:
serial_number=H0xx-0xxxxxx&page=0&bootloader_version=1.177
...
Read 6020 1d000000 005e 1d000000 1000 01 ....0 length=1024
0 36 6
1 30 0
..
22 31 1
23 20
Read 6020 1d000000 5e 1d000000 1000 1
0 xx yy
1 xx yy
2 xx yy
3 xx yy
4 xx yy
5 xx yy
6 xx yy
7 xx yy
8 xx yy
9 xx yy
a xx yy
b xx yy
c xx yy
d xx yy
e xx yy
f xx yy
length=1024
That string of 16 bytes the first value is the offset and the xx values are the ones we are interested in as the yy is the ascii representative of it, which we don't care about.
The function parse_firmware_log in functions.py has 3 lines that are important:
	serial[int(line_split[0], 16)] = line_split[1].zfill(2)
and
	long_serial_order = [10, 7, 8, 11, 0, 5, 12, 13, 15, 1, 2, 14, 4, 6, 3, 9]
	password = ''.join(list(map(serial.get, long_serial_order))).upper()
The first line creates a 16 byte array based on the first field being 0-f, then the two lines lists the correct order for the password from the byte array and uses map to reorder it and upper cases the string. This is your certificate password from the hub WOOP WOOP!!.
Then you can check the password against the credentials file using the command:
awk -F":" '{print $9}' credentials.bin | base64 -d > certificate.p12
openssl pkcs12 -nodes -passin pass:**PASSWORD** -in certificate.p12 -out certificate.pem
If that successfully opens the PKCS12 certificate you know you have done it successfully!!
Lastly unplug the power to the hub and then hold down the "reset" button underneath the hub with a pen or something then plug the power in and you will see the the firmware update process start. This doesn't actually reset the hub, it just causes it to download the latest firmware so you won't lose your cloud configuration
PolarProxy
After you have the password you can use PolarProxy to Me In The Middle (MITM) and save all decrypted traffic from the hub talking with the cloud service.
Versions:
- Linux x64 download :
curl https://www.netresec.com/?download=PolarProxy | tar -xzf - - Linux arm 32 bit :
curl https://www.netresec.com/?download=PolarProxy_linux-arm | tar -xzf - - Linux arm 64 bit :
curl https://www.netresec.com/?download=PolarProxy_linux-arm64 | tar -xzf -
You need to poison two DNS entries to point to your host running PolarProxy, but you knew that already right??? Right?:
hub.api.surehub.io
a5kzy4c0c0226-ats.iot.us-east-1.amazonaws.com
HTTPS Credentials traffic
Using this shell script you can capture all HTTP
#!/bin/bash

#Convert self signed iot files to pkcs12 file with a password of password
openssl pkcs12 -in hub.pem -inkey hub.key -password pass:password -export -out hub.p12

mkdir web
./PolarProxy -v -p 443,80 --autoflush 10 -o web --insecure -servercert hub.api.surehub.io:hub.p12:password --nosni hub.api.surehub.io
MQTT TLS AWS IoT traffic
Script actions
- Generate a certificate for AWS IoT endpoint
- Make sure we have the Credentials file which includes the Client Certificate needed, othewise download it
- Extract the Client Cert from Credentials into PKCS12 file
- Check to make sure the password for the PKCS12 file is correct
- Start PolarProxy with the AWS IoT generated certificate as the server certificate and client certificate with the password
#!/bin/bash

#Convert self signed iot files to pkcs12 file with a password of password
# openssl req -x509 -newkey rsa:2048 -nodes -keyout iot.key -out iot.pem -sha256 -days 3650 -config <(echo -e "[req]\ndistinguished_name=req") -subj '/CN=a5kzy4c0c0226-ats.iot.us-east-1.amazonaws.com' -addext "subjectAltName=DNS:a5kzy4c0c0226-ats.iot.us-east-1.amazonaws.com"
openssl pkcs12 -in iot.pem -inkey iot.key -password pass:password -export -out iot.p12

fw=2.43
serialnumber=H0xx-0xxxxxx
macaddress=0000xxxxxxxxxxxx
certpassword=XXXXXXXXXXXXXXXXXXXXXXXXXXXXXXXXX

if [ ! -f $serialnumber-$macaddress-$fw.bin ]; then
		curl -v -k -d "serial_number=$serialnumber&mac_address=$macaddress&product_id=1&firmware_version=$fw" -H "curl/7.22.0 (x86_64-pc-linux-gnu) libcurl/7.22.0 OpenSSL/1.0.1 zlib/1.2.3.4 libidn/1.23 librtmp/2.3" -H "Content-Type: application/x-www-form-urlencoded" -X POST -o $serialnumber-$macaddress-$fw.bin https://hub.api.surehub.io/api/credentials
fi

awk -F":" '{print $9}' $serialnumber-$macaddress-$fw.bin | base64 -d > $serialnumber.p12

openssl pkcs12 -nodes -passin pass:$certpassword -in $serialnumber.p12
if [ $? -gt 0 ]; then
	echo OpenSSL Failed you need to fix the password
	exit
fi

mkdir mqtt
./PolarProxy -v -p 8883,1883 --autoflush 10 -o mqtt --insecure --clientcert a5kzy4c0c0226-ats.iot.us-east-1.amazonaws.com:$serialnumber.p12:$certpassword --servercert a5kzy4c0c0226-ats.iot.us-east-1.amazonaws.com:iot.p12:password --nosni a5kzy4c0c0226-ats.iot.us-east-1.amazonaws.com
Older Hubs with original firmware
In the unlikely event The older model hubs before the H010-xx revsion they have firmware that send out the long_serialnumber when they first boot up which is handy. If you setup the environment you should see the hub connect to the web server to talk to the /api/credentials endpoint and send a message like:
serial_number=H008-0xxxxxxx&mac_address=0000xxxxxxxxxxxx&product_id=1&long_serial=xxxxxxxxxxxxxxxxxxxxx
So... that last value is what you need, it's the password for the AWS Certificates so write it down, then follow the standard instructions to update the hubs firmware buy pressing and holding the reset button when you plug the power in to update the firmware.